


There is a lot of content out there on how to configure projects to use Kotlin DSL. I could not find content that extensively explains what is going on, and the underlying principles behind what we are doing, especially for someone who is moving up in their career and want to understand the whole thing. This tutorial is focused on why with a few snapshots of how from our Github project. There is a lot of information that we need to understand, from the build process, domain-specific languages, various configurations, and so forth. I will focus on the key concepts, and how they relate to each other.
Objectives
Theory
- Grandle and Android build process
- DSL and Kotlin DSL for dependency management
Hands-on
- Setting up Kotlin DSL for Android Project
- Manage dependencies with Kotlin DSL
Gradle and Android Build Process
Gradle
Most projects involve several artifacts and resources working together. The artifacts are then built into an application that runs in a specific environment. Gradle is a build automation tool that automates the software build process like
- compiling
- building
- packaging
- testing
- deploying to various platforms.
Besides that, it ensures there is high-speed performance and consistency in the build process, while also allowing developers to customize the application.
Gradle works on three concepts
- Project - the work that needs to be done like compilation and deployment.
- Tasks - single activity in the build process like creating JAR files.
- Build script - file which is located at the root of the project/module and contains artifacts required by Gradle to perform each task.
Gradle has a very robust documentation here, you can check it out. It is used in most Android projects.
Android Build Process
A Kotlin/Java code we write on Android studio is converted into a version that can run on different android devices. Gradle is the build tool for Android applications. It automates the stuff that we do not want to worry about. The Gradle and android plugin make the android build system, making it easy to build your project independent of the platform ie you can build on Android Studio, terminal or remote server.
The image below Adapted from the Android developer's website shows the build process.
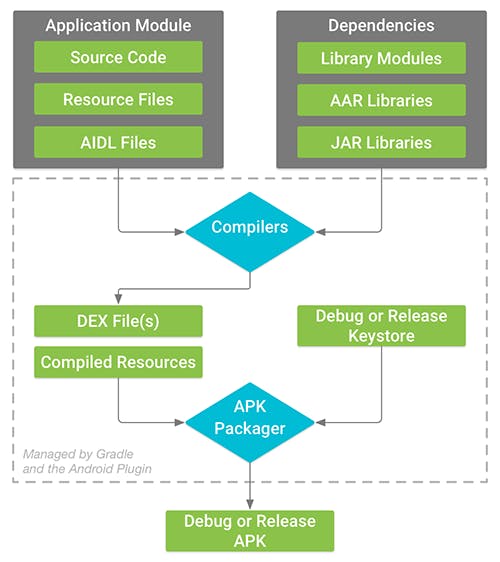
The big picture of building an android application is to build an application into the app bundle (AAB) or application package (APK) that you sign and release or test. The build process takes place in three stages
- The source code is converted into a DEX file. Android runtime uses ART, JIT, AOT, or Dalvik runtime. You can read more on the Android Runtime from this article or from the official documentation
- The app is packaged into APK or AAB. We specify at least one build type in the project level build Gradle.
- Signing - the packager signs the application using the build variant selected. It is then optimized for release.
Gradle gives us the capacity to customize the configuration of our application. That is the beauty of using Grade in projects. We have the leeway to configure our dependencies in a way that makes it easy to scale the project. Gradle for dependency management has robust documentation on how the dependencies work to help us figure out how to manage the dependencies effectively. We will explore a few aspects of dependency management with Gradle.
Android projects depend on various libraries and modules configuration, which require proper management. Gradle uses Groovy DSL to automate dependency management in most JVM projects. The DSL has an inbuilt dependency management process, that automatically knows how to download and supply the dependencies as needed. However, you need to declare the dependencies to tell Gradle where to get the dependencies for the build.
You can use public or private repositories. The two common public repositories we use for android projects are mavenCental and google for Android projects. There are several other ways of declaring dependencies, depending on the organizational preferences. For example, if your dependencies are in a file directory, you define the resource as a flatDir object and define the direction with dirs("lib"). You can also have a mavenLocal
This tutorial is optional if you are fine with Groovy. However, most organizations are moving towards Kotlin DSL for dependency management. But what is DSL?
Domain Specific Language
Design Specific Language (DSL) is a design pattern that attempts to make the code expressive and fluent, such that anyone can understand the code. A DSL in itself is a programming language, which offers higher levels of abstraction to solve a specific problem. In most scenarios, we use DSL for configuration, because it is easier to understand. By using DSL, you get the advantage of
- Reveal intent - you know what the code does out of the box. We want to spend the least time on configuration, and more time on solving our specific problem. Revealing intent is making it closer to what we want to do with the code
- Consistency - we want our production versioning to be centralized and consistent. Kotlin DSL gives us a central location for all our dependencies and versions.
- Fluency - Kotlin DSL is more fluent and it is easy to express in Kotlin.
- We also want to remove the duplication, while using the fewest lines of code.
But DSL is not limited to dependency management. Remember DSL is a design pattern, usually following Language Oriented Programming with a large focus on making code optimal and also readable even for non-programmers. CSS is an example of DSL which is extensively used to style UI elements. But that is outside the scope of this tutorial. You can check using DSL with Lambdas by Tino Balint or this example from 12 days of Kotlin
Understand Groovy DSL
Using Kotlin DSL is optional for developers who wish to use Kotlin DSL over Groovy DSL. The Kotlin DSL comes with a number of advantages.
Let's deviate and look at the main components of Groovy DSL
How Android Build System Works
I figured out that understanding how the build process works under the hood will help us customize the build process. The settings.gradle file is for listing all the modules in the application. For our case, we have 3 modules, the app, domain, and data modules.
The Gradle plugin knows how to build your project, depending on the dependencies you use. For example, if you want to compile an application into an android app, we use the android plugin.
The Gradle operates by using tasks, which take inputs, process, and give output according to the specification. The Gradle uses grade DSL for configuration. It is important to change to Kotlin DSL because that is what most companies use.
Gradle parses Gradle DSL in the project level build.gradle file and to build AGP DSL objects such as BuildType and ApplicationExtension
The android.application plugin comes with its DSL to configure app properties, where you configure android specific build parameters like SDK versions, app details, and configuration for different build types like debug, release, and production.
Hands-on
Convert dependencies from Groovy to Kotlin
Let's get to the real meat of what we are doing. From previous tutorial, we have a skeleton of our multimodule application.
The Kotlin and Groovy DSL are very different in terms of how we declare artifacts. Some of the key things you need to look out for are:
Groovy uses single quotes, like
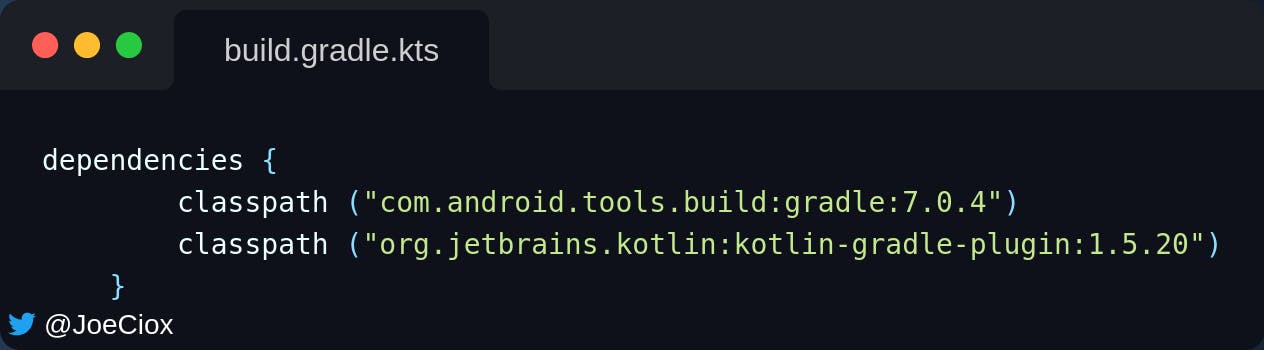
classpath 'com.android.tools.build:gradle:7.0.3'while Kotlin requires double quotes ieclasspath ("com.android.tools.build:gradle:7.0.4")In Groovy, buildTypes are explicitly stated, like
 but in Kotlin, most of the common buidTypes are available by default, and thus implicitly define like below
Setting up Project for Kotlin DSL
- Create buildSrc Go to the root of your project, the same level as data, domain, and presentation modules, and name it buildSrc.
On Project View, Right Click Github highlight New then Directory and name it buildSrc
The buildSrc will contain build information for your project. It is on this file that we tell the project to use Kotlin DSL. The folder will also contain the information which we can share across different modules, such as versions and libraries. It abstracts the imperative logic and helps us maintain complex build logic.
When Gradle discovers the buildSrc folder, it automatically adds the folder into the build folder, compiles and tests the folder, and adds it to the classpath where the build script. It gives helps us
- have a dedicated file to declare dependencies
- refactor dependencies with ease
- test dependencies with ease
maintain dependencies from one place
Enable Kotlin DSL To achieve the above, we need to enable Kotlin DSL. Create a file at the root of buildSrc and name it
build.gradle.ktsas shown below.
 Build the project.
If you are moving from Groovy DSL to Kotlin DSL for the first time, ensure you build the project every time you make changes.
At this point, Gradle is aware we will use Kotlin for dependency management.
Convert Files from Groovy to Kotlin
We need to change the existing files before we start adding more dependencies to the files
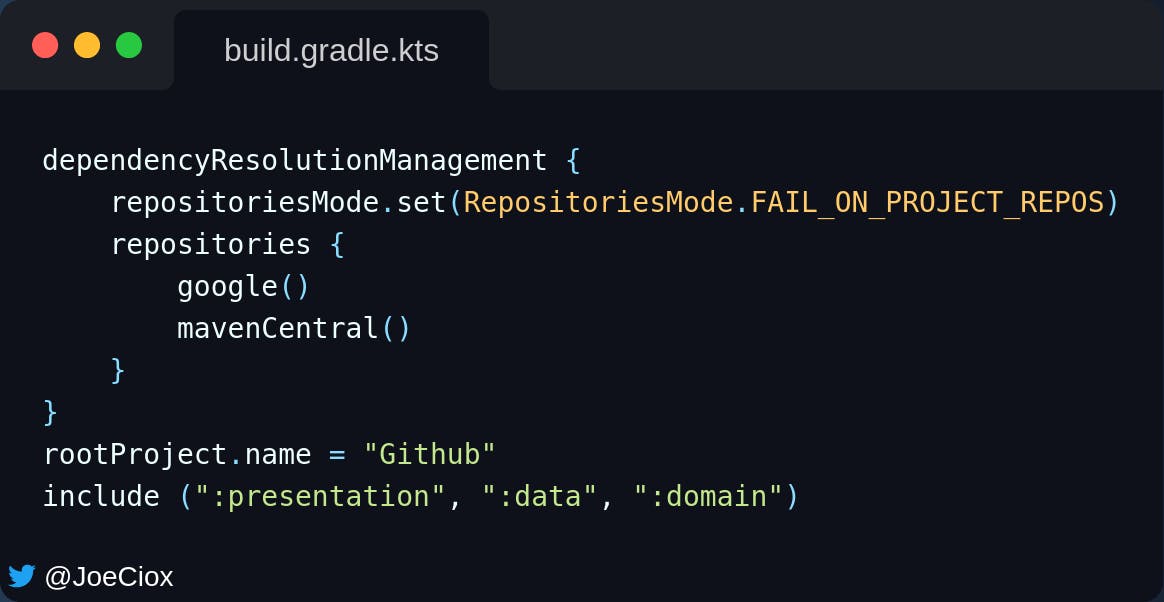
settings.gradle
- Rename the file from
settings.gradletosettings.gradle.kts - Replace single quotes with double quotes and add brackets.
- Build the project.
The final settings file will be as shown.
Project Level Gradle Build
- Rename the file name from
build.gradletobuild.gradle.kts - Replace single quotes with double quotes and add brackets as shown
- Sync and build the project
- Edit task-register.

- Ensure all URLs look like one below

Module Level Gradle
Presentation Plugins
- Change file name from
build.gradletobuild.gradle.kts - Replace single quotes with double quotes and add brackets as shown

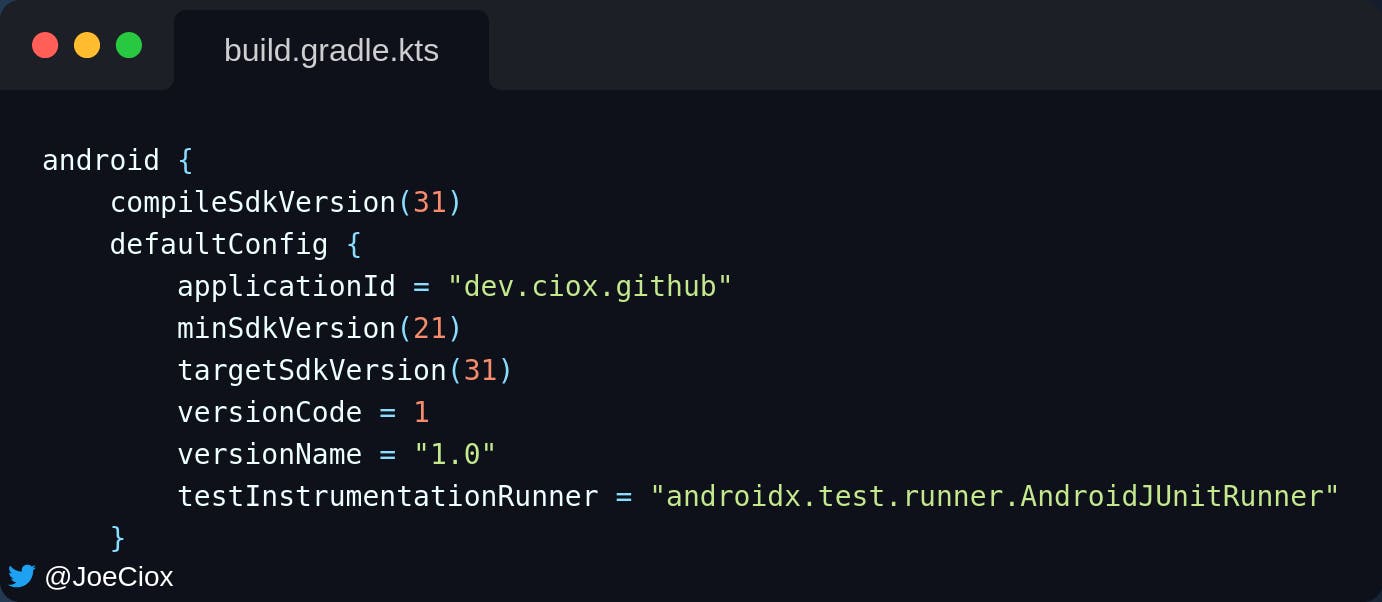
Android
- Change the values to function, and strings to property call
- For functions, add them to brackets, and for values use the equal sign
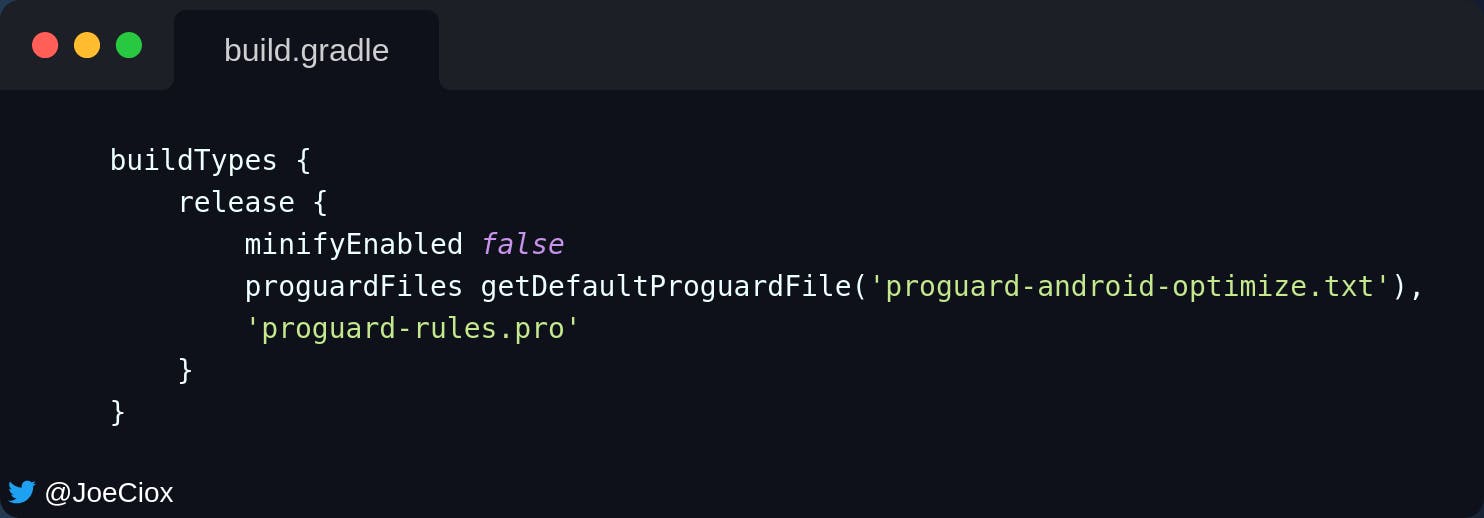
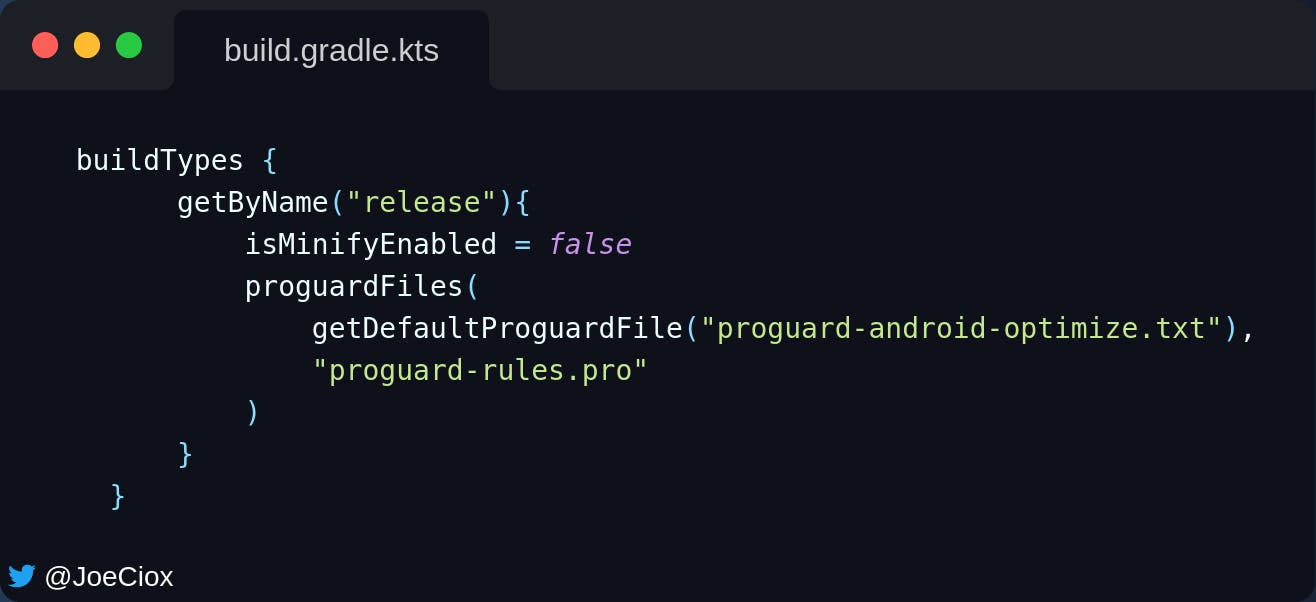
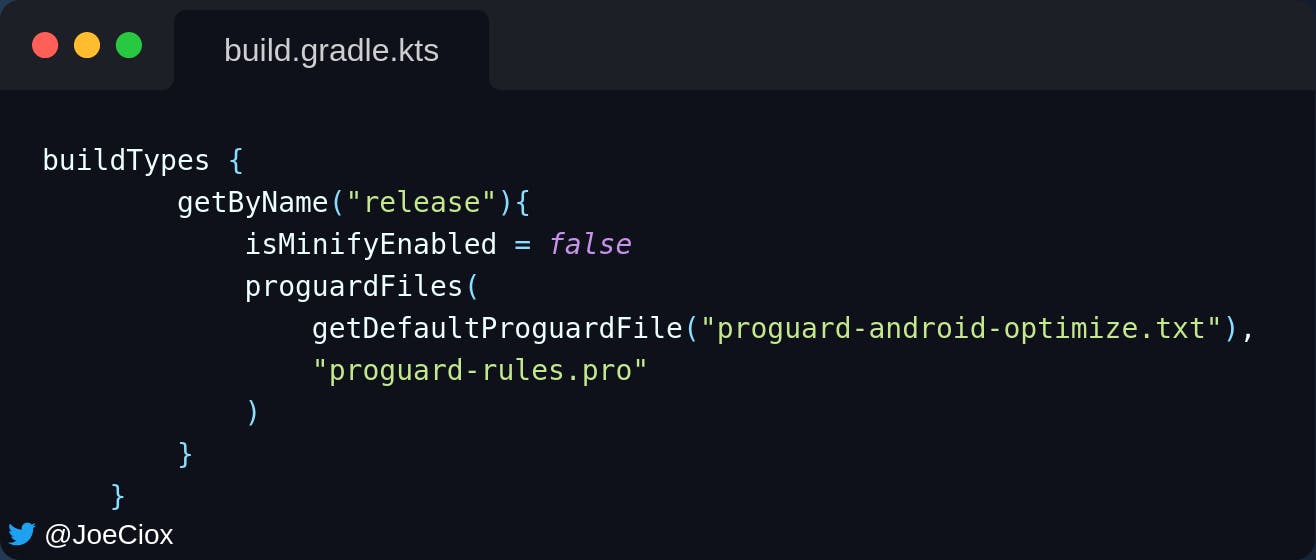
Build types
- Some build types are available by default, like release and debug
- For minify, we call the
isMinifyEnabledfunction - For Proguard, we call
getDefaultProguardFilefunction
Add as shown below
Update the domain and data modules.
Ensure the project compiles after changing the files each time.
Centralize Dependencies
Now that we have successfully moved to Kotlin, the next step is to centralize the dependencies and versions. We will also add most of the dependencies we need for the project.
You can use the project as a template for your projects.
Create a Kotlin directory inside the buildSrc folder.
Go to New => Directory => src/main/kotlin
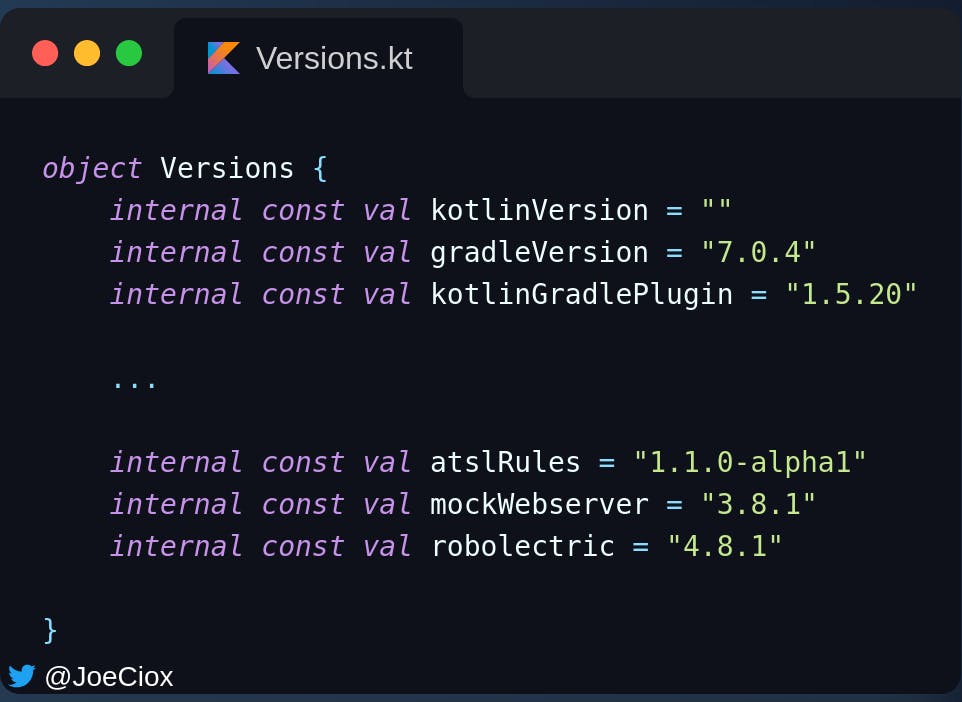
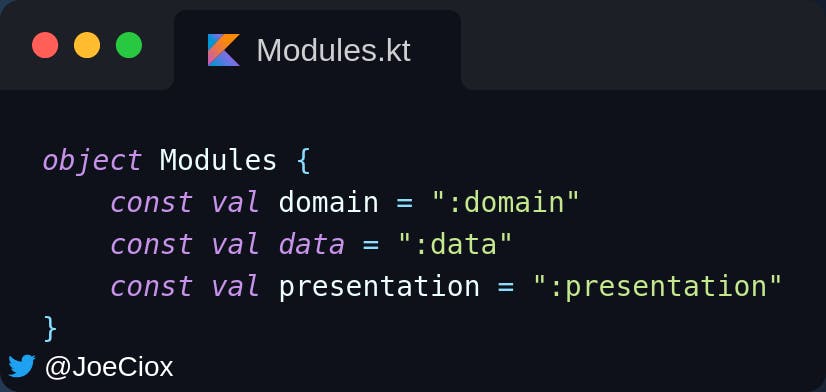
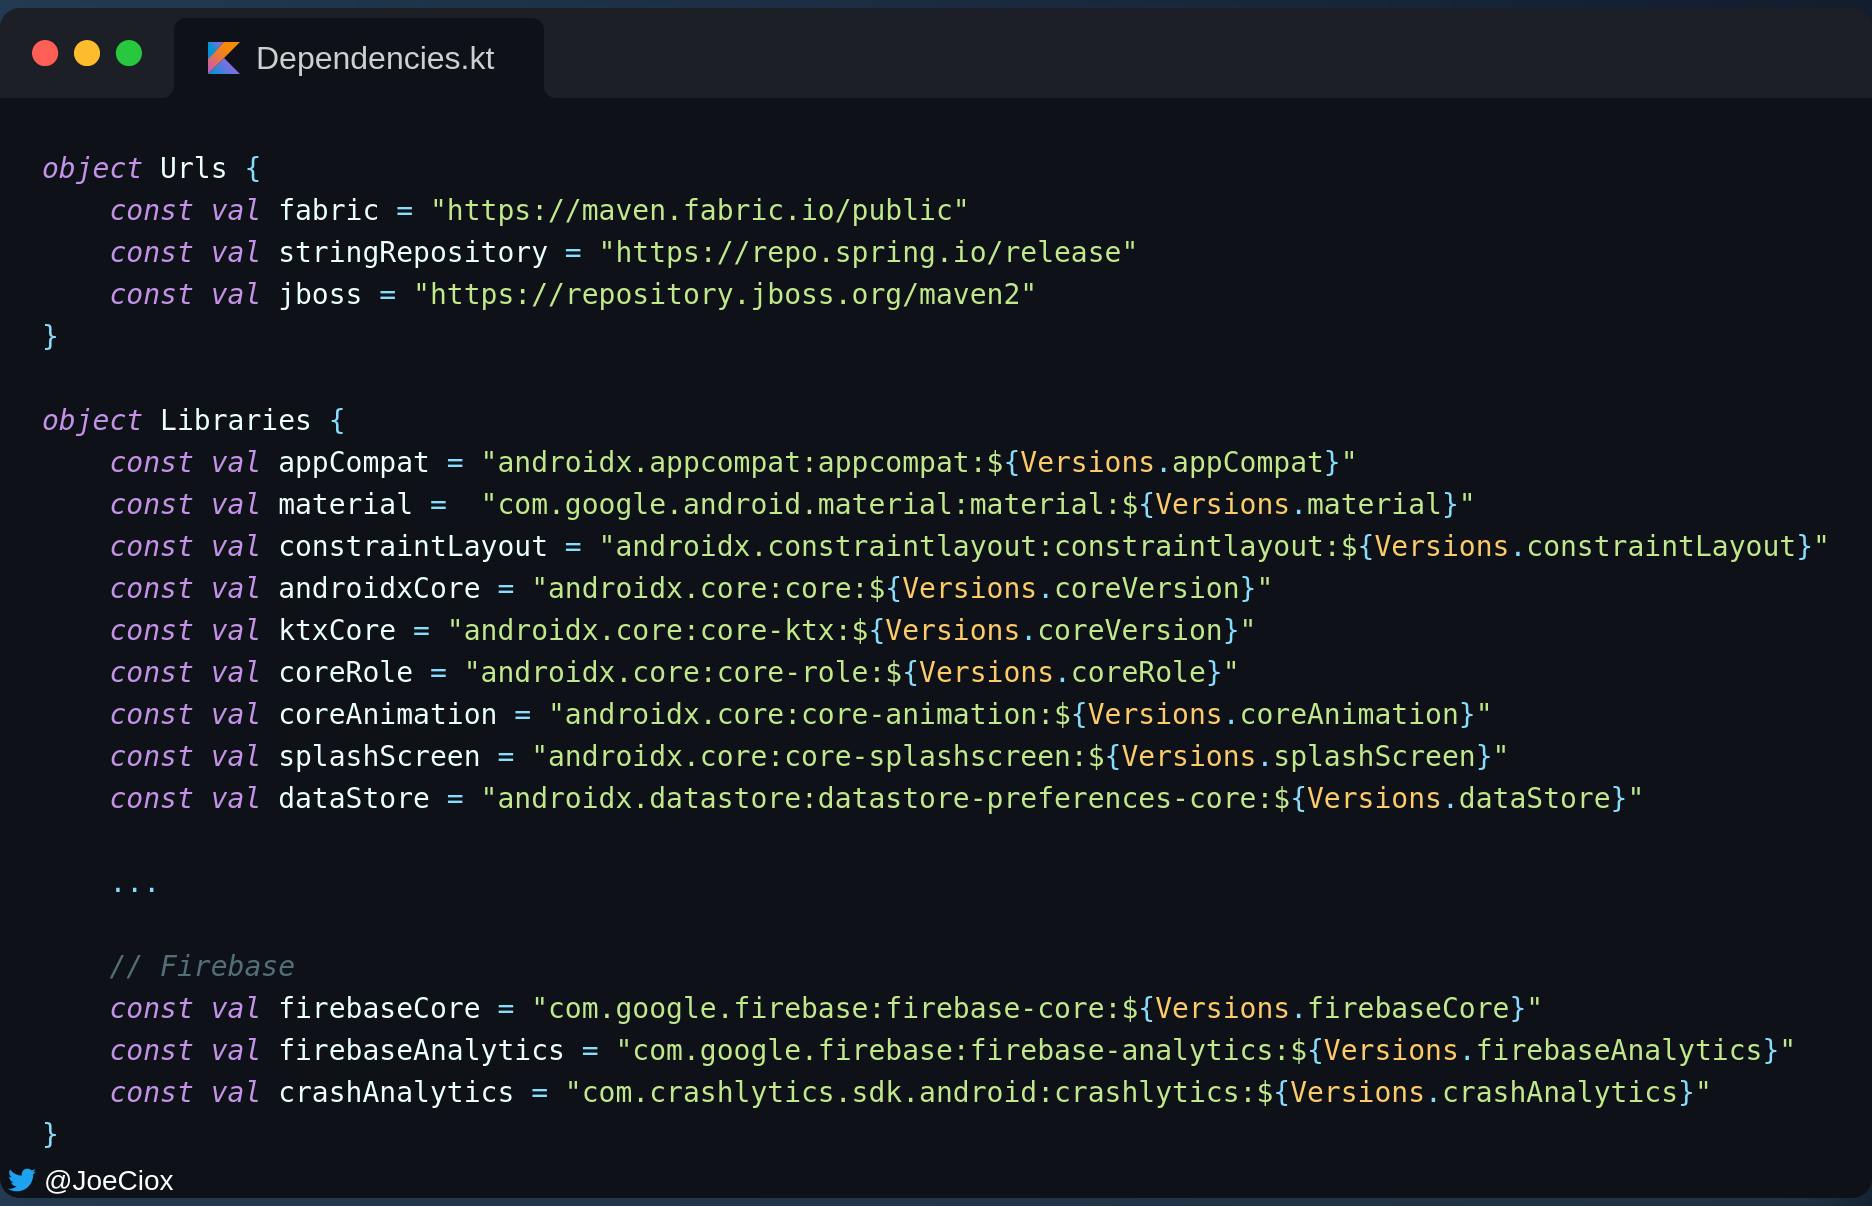
Create four Kotlin Object files inside the new directory. Here, you have a choice on how you would like to organize your files. In my case, I have four files
Config.ktfile which contains the main configuration information like build plugins, android artifacts versions, Gradle plugins, and builds types.
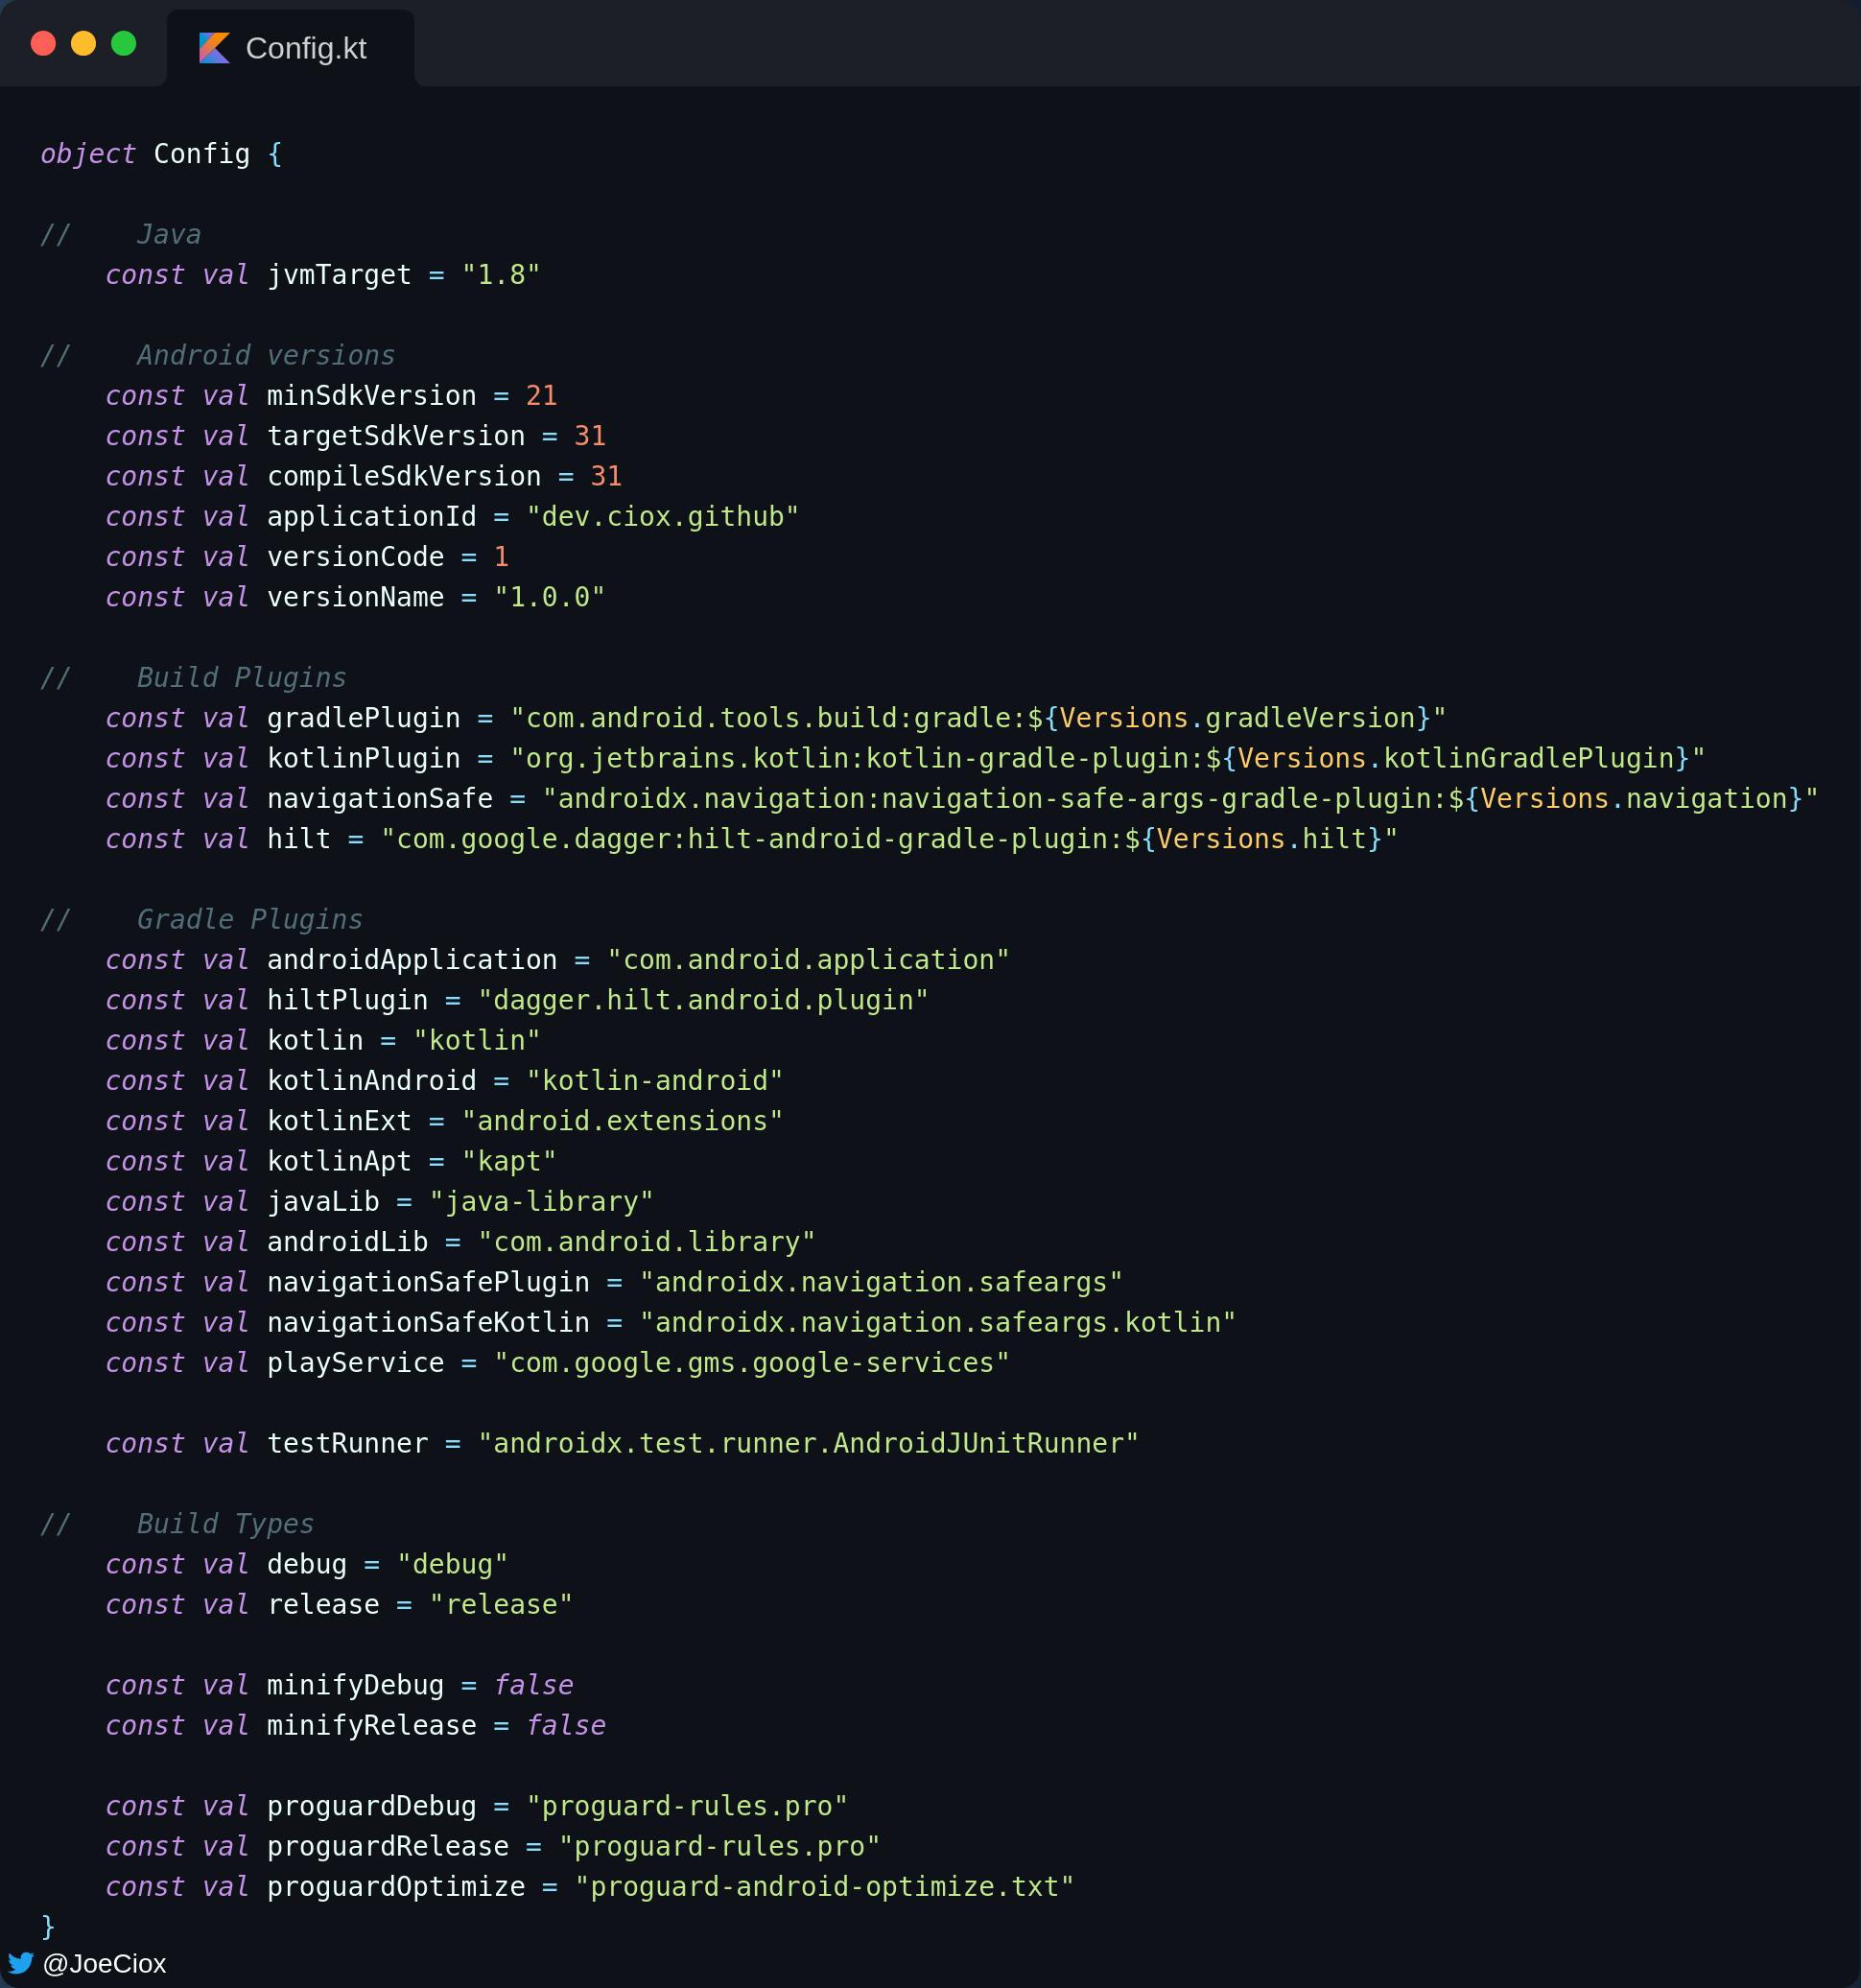
Versions.ktfile which has the versions for all the libraries and dependencies in the project. I have omitted most of the dependencies and versions for simplicity.
Modules.ktfile which has the modules
Dependencies.ktwhich has all the library dependencies for the project.
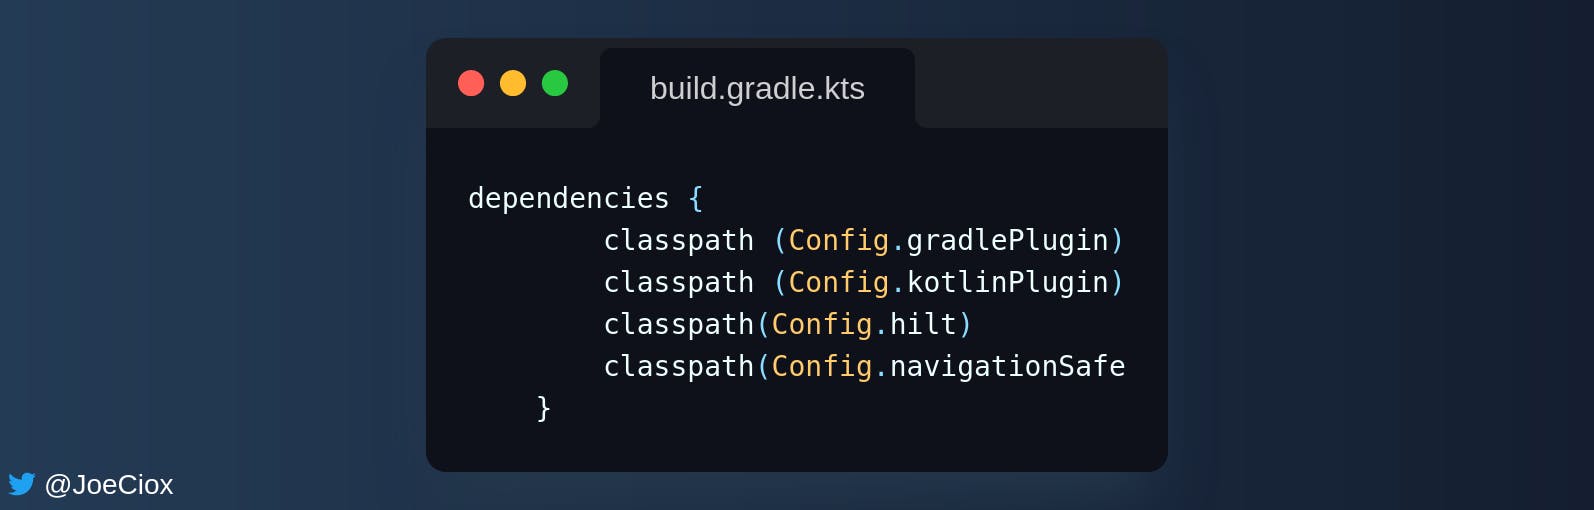
Now update the Gradle files to use the dependencies and config files from buildConfig folder.
The project-level config becomes
Presentation level plugins
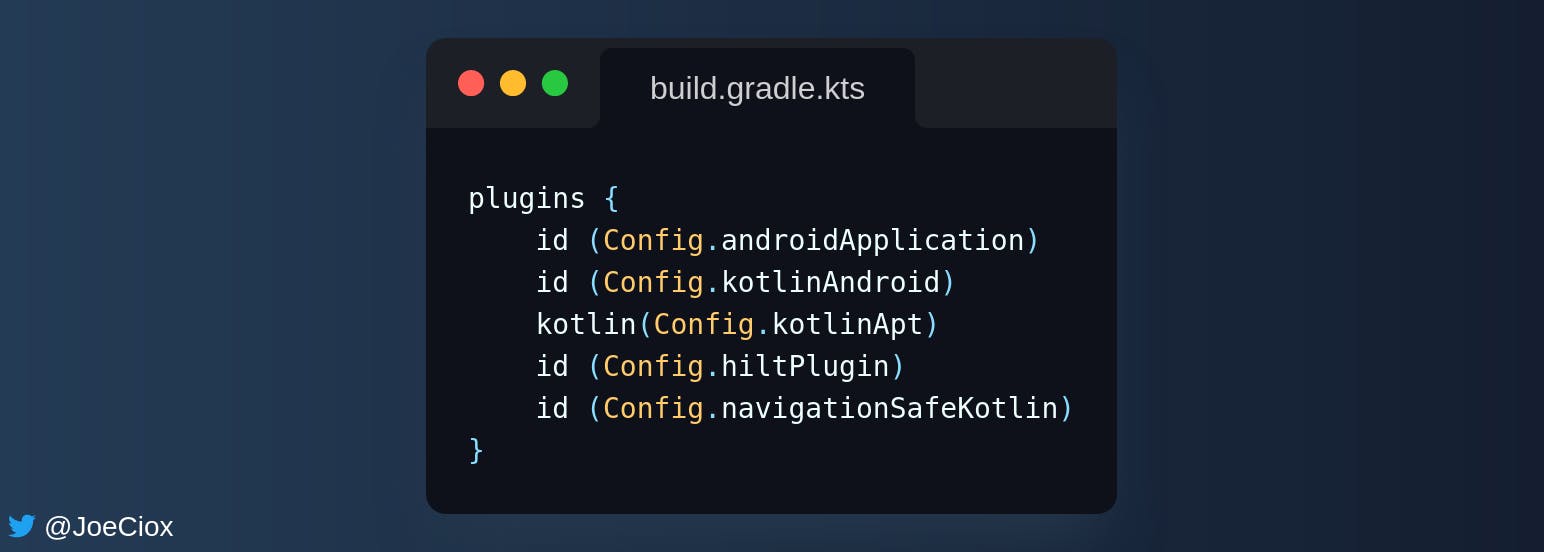
These are some of the dependencies
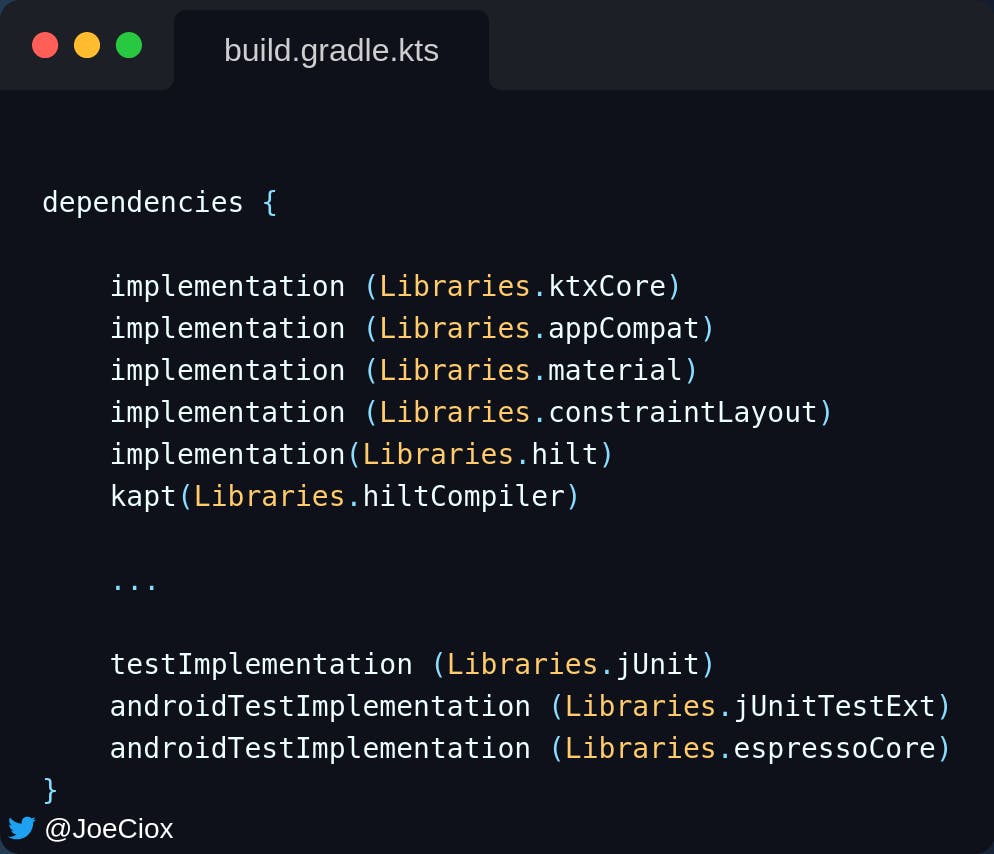
Go on and update the dependencies in other modules.
You can check the final code here
If you have challenges moving around, contact me on Twitter